Grow pumpkins in molds include selecting the right mold, preparing the soil, planting the pumpkin, securing the mold, maintaining the plant, and harvesting the pumpkin. Each step is crucial in ensuring that the pumpkin takes the desired shape and grows to its full potential.
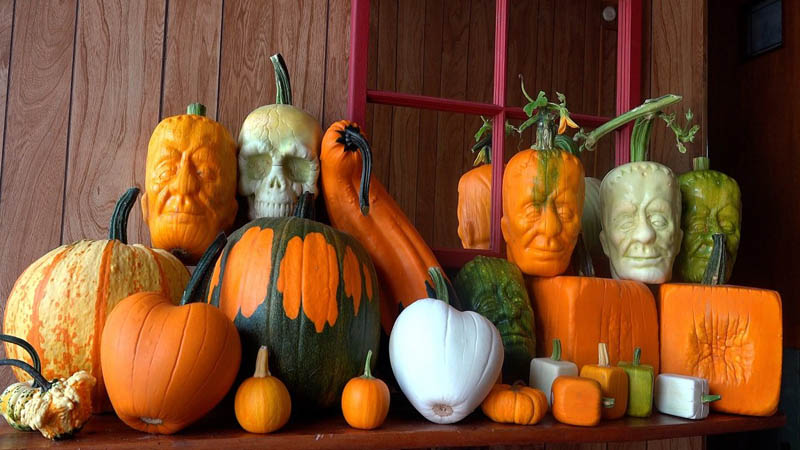
Growing pumpkins in molds is a unique gardening technique that involves using a mold to shape the pumpkin as it grows, creating a decorative and impressive display. This technique can be used to create pumpkins in various shapes, including squares, hearts, and even human faces.
It requires careful selection of molds, proper care, and attention to detail to achieve the desired results. In this article, we will discuss how to grow pumpkins in molds.
Let’s have a look.
9 Steps To Grow Pumpkin In Molds
Growing pumpkins in molds is a unique and fun way to create impressive and decorative pumpkins. However, it requires proper planning and execution to ensure a successful outcome.
The mold process involves placing a young pumpkin fruit into a mold and allowing it to grow and take the shape of the mold, resulting in a pumpkin with a distinct shape and pattern.
With the right tools, techniques, and patience, anyone can successfully grow pumpkins in molds and create beautiful, eye-catching displays. The steps are given below;
1. Choose The Right Molds
Choosing the right molds is a crucial step when growing pumpkins in molds. The molds should be made of sturdy material, such as plastic or metal, and should be free of any cracks or damage.
The size of the mold should be large enough to accommodate the growing pumpkin fruit but not so large that it hinders its growth. Additionally, the mold’s shape should match the desired final shape of the pumpkin.
It is essential to choose molds that are easy to work with and can be secured firmly in place to prevent any damage to the growing fruit. Careful consideration should be given to the mold’s design, as it will impact the pumpkin’s overall appearance.
Related Reading
2. Prepare Your Soil

Preparing the soil is an essential step to growing pumpkins in molds successfully. For this, select a suitable location that receives full sunlight and has well-drained soil.
The soil should be enriched with organic matter, such as compost or aged manure, to provide the necessary nutrients for the pumpkin plant. The soil should be tilled to a depth of at least 12 inches to ensure proper aeration and root growth.
Before planting, it’s recommended to perform a soil test to determine the pH level and adjust it to the appropriate range for pumpkin growth.
3. Plant The Seeds

To grow pumpkins in molds, plant the pumpkin seeds in nutrient-rich soil in a warm and sunny location. Select a mold that matches the desired shape for the pumpkin. Carefully place the young pumpkin fruit into the mold, making sure to secure it in place.
As the pumpkin grows, continue to monitor and adjust its position within the mold, ensuring that it takes on the desired shape.
4. Wait For Seeds To Sprout
Once you have chosen your mold and prepared the soil, now you have to wait for the seeds to sprout. Plant the pumpkin seeds directly into the soil, ensuring they are spaced at least two feet apart.
Pumpkin seeds usually take 5–10 days to germinate, and you should see sprouts emerging from the soil.
Once the seedlings are a few inches tall, choose the strongest one mold and remove any others that are competing for space. Allow the remaining seedling to grow and establish a strong root system before transplanting it into the mold.
5. Place The Molds On Plants
Select a mold, which should be cleaned and disinfected to avoid any potential for disease or contamination. Next, a young pumpkin should be selected and carefully placed inside the mold.
The mold should be secured to the plant using twine or other means to ensure that it stays in place as the pumpkin grows.
As the pumpkin grows, it will take on the shape of the mold, resulting in a unique and eye-catching display. Once the pumpkin has reached maturity, it can be carefully removed from the mold and harvested for use or decoration.
6. Monitor The Plants Growth
To successfully grow pumpkins in molds, it is essential to monitor the plants’ growth closely and provide the right conditions for them to thrive. Select a healthy pumpkin plant and a mold of the desired shape.
Carefully place the young pumpkin fruit into the mold, securing it in place and providing support if necessary. Monitor the plant’s growth and adjust the mold as necessary to ensure that the pumpkin grows into the desired shape.
Once the pumpkin has fully matured, carefully remove it from the mold and display it as desired.
7. Harvest The Pumpkins
Harvesting pumpkins grown in molds requires patience and careful attention to the growth of the fruit.
As the pumpkin grows, you’ll need to adjust the mold to ensure the pumpkin remains in shape and doesn’t outgrow the mold. You’ll also need to monitor the pumpkin’s growth, making sure it receives adequate water, sunlight, and nutrients.
Once the pumpkin reaches maturity, it’s time to carefully remove the mold and harvest the fruit, being careful not to damage the pumpkin’s unique shape.
8. Prune The Pumpkin Vines
Pruning the pumpkin vines is an important step when growing pumpkins in molds. This involves removing the excess vines and leaves to ensure that the pumpkin fruit receives enough sunlight and nutrients to grow and take the shape of the mold.
Make sure to secure the mold around the pumpkin fruit, leaving enough room for the fruit to expand as it grows.
As the pumpkin fruit grows, prune the vines to direct the energy toward the fruit and remove any damaged or diseased leaves.
9. Pollinate The Flowers
Once the plant begins to produce flowers, it’s important to hand-pollinate the flowers by using a small brush to transfer pollen from the male flowers to the female flowers.
As the pumpkin fruit begins to grow, carefully place it into the mold and secure it in place. Continue to water and care for the pumpkin plant until it fully matures and is ready to be harvested, usually around 100–120 days after planting.
Related Reading
- 10 Unique Sweet Cucumber Dishes You Must Try
- 26 Early Growing Tomato Varieties For Short Season
- Carrot Black Root Rot: Symptoms, Causes, and Prevention Methods
Conclusion
Growing pumpkins in molds is a unique and creative way to add interest to your garden and impress your friends and family. The process requires careful planning, attention to detail, and patience, but the end result can be a beautiful and decorative pumpkin that is sure to be a conversation starter.
By selecting the right mold, preparing the soil, hand-pollinating the flowers, and carefully placing the pumpkin fruit into the mold, you can successfully grow pumpkins in a variety of shapes and sizes.
With proper care and maintenance, your pumpkin plant can produce a bountiful harvest that will delight you and your loved ones.
Thanks for reading.